Testing Locally
Before sharing your project with the world, let’s make sure it works properly on your own computer.
What Does “Testing Locally” Mean?
Section titled “What Does “Testing Locally” Mean?”“Local” means on your own computer (as opposed to “the cloud” or “online”).
When you test locally:
- Only you can see it
- Changes appear instantly
- You can break things safely (no one else will see!)
- It’s free - no hosting needed
Accessing Claude’s Changes with Github Desktop
Section titled “Accessing Claude’s Changes with Github Desktop”
Step 1: Open GitHub Desktop
Section titled “Step 1: Open GitHub Desktop”Switch to GitHub Desktop. You should see the above bar at the top. The left-most section is the repository you are on. The middle section is the branch you are on and the rightmost section is the ‘actionable’ section.
Step 2: Navigate to your branch
Section titled “Step 2: Navigate to your branch”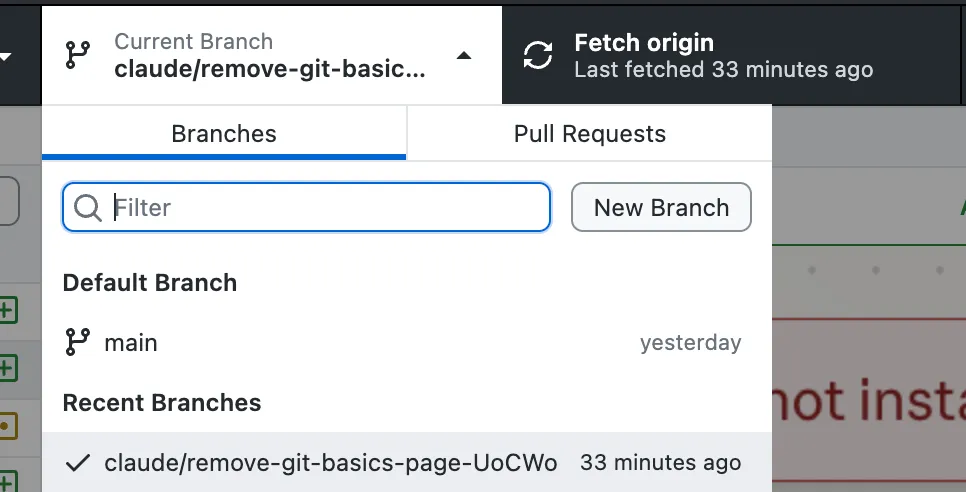
Use the branch selector to select the branch that Claude worked on.
Pulling from Origin
Section titled “Pulling from Origin”After you select the correct branch, you may see a button to “Pull Origin”. Do that. If not click on ‘Fetch Origin’ and wait for the app to check for updates.
Testing Locally
Section titled “Testing Locally”There are two methods, you can choose between to test Claude Code’s work.
Method 1: Just Open the HTML File
Section titled “Method 1: Just Open the HTML File”If you choose to build a simple static project, then the simplest way to view your project is to navigate to the folder in your file finder and open the index.html file
Opening this file should open a new browser window and you should be able to view your project.
file:///path/to/your/file. This means you're viewing a local file, not a website on the internet.
Method 2: Use a Local Server (Recommended)
Section titled “Method 2: Use a Local Server (Recommended)”Some features (like loading data or using certain JavaScript) require a “real” server. Here’s how to set one up:
Step 1: Opening Terminal
Section titled “Step 1: Opening Terminal”Windows:
- Press
⊞ Win + Rto open Run dialog - Type
cmdand press Enter - The Command Prompt window will open
Mac:
- Press
Cmd + Spaceto open Spotlight - Type
Terminaland press Enter - The Terminal window will open
Step 2: Navigate to Your Project
Section titled “Step 2: Navigate to Your Project”In the terminal, use cd (change directory) to go to your project folder. You can use the system’s folder information menu action to find the full folder pathname.
Windows:
cd Documents\GitHub\my-projectMac:
cd ~/Documents/GitHub/my-projectYou can verify you’re in the right place by running:
- Windows:
dir - Mac:
ls
You should see your project files (or an empty folder if you just created it).
Step 3: Run the server
Section titled “Step 3: Run the server”Now that you have navigated to your project folder in the terminal, run the follwoing command:
Python 3:
python -m http.server 8000Python 2 (older systems):
python -m SimpleHTTPServer 8000This should setup the local server at port 8000 and when it’s running, it should open up your browser automatically to the correct url. If it doesn’t use the url below.
http://localhost:8000If you encounter any error in the terminal window, copy and paste that error into Claude’s chat and Claude will be able to tell you what you need to do.
Testing Checklist
Section titled “Testing Checklist”Go through your project and check these things:
Visual Checks
Section titled “Visual Checks”- Does everything appear on screen?
- Do the colors look right?
- Is text readable (not too small/large)?
- Do images load correctly?
Interactive Checks
Section titled “Interactive Checks”- Do buttons do something when clicked?
- Do links go to the right places?
- Do forms accept input?
- Do animations/effects work?
Responsive Checks (Mobile-Friendly)
Section titled “Responsive Checks (Mobile-Friendly)”Most browsers let you simulate mobile devices:
- Right-click anywhere on the page
- Click “Inspect” or “Inspect Element”
- Click the device toggle icon (looks like a phone/tablet)
- Select different devices to test
Found a Problem? Fix It!
Section titled “Found a Problem? Fix It!”When something’s not right, you have options:
Option 1: Ask Claude Code
Section titled “Option 1: Ask Claude Code”Go back to Claude Code and describe the issue:
When I click "Submit", nothing happens. The form shouldshow a success message.Or take a screenshot of the error and describe how you would want to fix it.
The color contrast of the button on the homepage isn't as per accessibility guidelines. Can you fix it?Option 2: Debug Yourself
Section titled “Option 2: Debug Yourself”Open your browser’s developer tools:
- Windows: Press
F12orCtrl + Shift + I - Mac: Press
Cmd + Option + I
Look for red error messages in the Console tab. These tell you what went wrong. If you can’t understand what they mean, paste these messages into Claude chat and it will be able to help you take the next steps.

Troubleshooting
Section titled “Troubleshooting”Images Not Loading
Section titled “Images Not Loading”Possible causes:
- Wrong file path (check the
srcattribute) - File is in the wrong folder
- Typo in the filename (case matters!)
Fix: Make sure your image path matches exactly where the file is:
<!-- If image is in the same folder --><img src="photo.jpg" alt="Photo">
<!-- If image is in an "images" folder --><img src="images/photo.jpg" alt="Photo">
CSS Not Applying
Section titled “CSS Not Applying”Possible causes:
- CSS file not linked in HTML
- Typo in the CSS link path
- Browser cached old version
Fix: Check your HTML <head> section:
<link rel="stylesheet" href="styles.css">Try hard refresh: Ctrl + Shift + R (Windows) or Cmd + Shift + R (Mac)
JavaScript Not Working
Section titled “JavaScript Not Working”Possible causes:
- Script file not linked
- Script loaded before HTML elements exist
- Syntax error in code
Fix: Check Console for errors, and make sure your script is at the bottom of the body:
<body>  <!-- Your content -->
<script src="script.js"></script> <!-- Put scripts at the end! --></body>Your project works locally and you've saved your progress. Are there any changes you would like to make?
Next Steps
Section titled “Next Steps”Now that you’ve got the first version of your vibe coded project running. You can proceed to make changes or head to deploy it on Github.